Showing posts with label Recipes. Show all posts

Sunday, June 9, 2013

Rainbow Cupcakes

My youngest sister graduated from high school this weekend. She was homeschooled and she had a graduation ceremony with two other girls from a homeschool co-op that her and my brother have been attending. So for the graduation each of the graduates had a special table with things that represented themselves - their interests, pictures, etc. They were also supposed to bring cupcakes to serve after the ceremony. So I agreed to make cupcakes for her. When I asked what kind she wanted she told me she liked bright colors. So what better way to have bright colors, than to have rainbow colored cupcakes?

I went in search of a recipe and found this recipe from Baking Bites. I looked over several recipes before deciding on this one. It looked fairly simple and I liked the fact that it would be a thinner batter to mix the colors in. The day before, I did a trial run of a dozen cupcakes to make sure they would turn out and any potential fails could be avoided. I did pretty good, and they actually weren't too difficult.

Before I started these, I decided I needed an apron. I'm just too messy in the kitchen. Especially if flour is involved. So I found some purple/lavender fabric and some rainbow sequin ribbon and created an apron for myself. I didn't get a picture unfortunately because I looked a little scary, but I will take one and post it eventually. But I'm pretty sure I'm the only one that liked my apron. Everyone else had either a "what in the world?" reaction, or just laughed at it. Rude.

So the day of, I gathered my supplies.

The only thing different I did from the recipe was used "Better for Bread" flour instead of all-purpose flour and used sunflower oil instead of vegetable oil. They still turned out fine. In the recipe she only makes 10 cupcakes. For my purposes I needed more cupcakes so I doubled the recipe and split it up to make 24 cupcakes instead of 20. There was plenty of batter for this.

When you get to mixing everything together, when you mix the wet ingredients to the dry ingredients, be sure not to stir it too much. Stir until everything is just mixed. It will be lumpy.
This is good. You are going to stir all the lumps out when you add the food coloring. I used gel food colorings. You could conceivably do this with as many or few or whatever colors you want. I just used red, yellow, green, blue, and mixed my own orange.
gif maker at gickr.com
fancy :)
So when your batter is all mixed up you layer the colors on top of each other in the muffin tin. I lined mine with white paper cups, since they would be travelling and it would be easier that way. Layer all your colors, in rainbow order, or whatever order you like, being sure not to stir or you'll end up with tie dye cupcakes I suppose. Just let each layer spread on its own. You will use about 1/2 tbsp of each color per cupcake.

As each layer went in, they got smaller and wouldn't spread out as far, but it wasn't bad. They still looked cute when they were done.
And you could see the rainbow colors through the white papers, so that was perfect.

For my frosting, I found this recipe for vanilla whipped cream frosting. Really simple and easy to get mixed up.
Three ingredients
All done!
My mom bought this weird decorating kit that came with a big syringe looking thing that you are supposed to put the icing in and then use it to decorate cakes and stuff. I used it, but it was difficult and made a HUGE mess. So next time I will definitely not be using it, I will just use the standard icing bag with decorating tips. But, all things considered they turned out pretty well.

I just did a simple spirally swirly shape on top. That's about all I have the skills for, and I didn't want them to look like dog poo. (You're welcome, sis.) I added some rainbow sprinkles on top, and called them good!

I'm pretty proud of how they turned out. And they were a big hit at the graduation. They went fast and I got lots of compliments. I promise my head's not too big. However, I will not be making these again any time soon, because they took me FOUR HOURS to make two dozen cupcakes. I know I'm not the fastest baker, but geez. It's just so time consuming to pour the batter in each cup by tiny spoonfuls. Plus I wanted to make sure these looked good since they were for a special occasion. But, all in all, they were a success, so go me!

So pretty :)


Saturday, May 18, 2013

Allspice Crumble Muffins

The other morning I woke up and wanted muffins. I haven't had muffins in such a long time so I just decided I'd make some. A quick internet search for "muffin" found me this recipe from Brown Eyed Baker that sounded delicious. I have recently discovered a love of allspice so these sounded perfect. Plus, I already had all the ingredients (major selling point).

I quickly mixed up the crumble topping, and the dry ingredients. Then I go to mix up the wet ingredients. I only had 3 eggs, but no big deal as the recipe only calls for 2. Then this happened.


Now, I don't know about you but to me, this looks suspiciously like what happens to a baby's diaper when he goes swimming in it... just saying. I swear I let the melted butter cool before I added the eggs to it. But it still failed. So I was stuck with half mixed up muffin mix, some nasty gloopy egg crap, and only one egg left in my carton.

So I had to cover up my mixing bowls, put on some real pants (bummer) and run to the store for more eggs, because I REALLY wanted these muffins. Attempt two was successful because I made sure the melted butter was extra cool before adding eggs.

Yum.
Here they are right before going into the oven.


I was a little worried about the crumble stuff on top because it is essentially just chunks of butter covered in a little flour and sugar. I didn't know if it was going to be gross or not. But I was pleasantly surprised because the tops ended up being chewy/crispy and delicious. I will say though that because there is so much butter on top of these that the bottoms of my muffin cups were pretty greasy. And I would definitely put the cookie sheet under your muffin tin because the tops expand and can kind of get everywhere.

But, bottom line these were worth the unexpected trip to the store because they were delicious. Buttery, crispy, chewy, light, fluffy, allspicey, goodness. I will definitely be making them again. 


P.S. When you use foil muffin cups, take them off before reheating your muffin in the microwave. Just a suggestion.

Monday, April 1, 2013

Lasagna Roll-ups


I want to share with you a recipe that I’ve done a few times now. Every time I’ve made it, it’s gone over really well with my family. I actually got my 13 year old brother to compliment my cooking with this one (and believe me, he’s hard pressed to say much nice to me about anything! Haha)

If you’re like me, cutting lasagna is something that never really ends well. It’s always a messy affair. This take on lasagna completely gets rid of all the mess and puts it in easy to serve rolls. One or two rolls are plenty for a meal. This recipe was used as dinner for 5 people, including a 13 year old with a bottomless stomach, so it’s a lot of food.

Here’s what you need:
·         12 lasagna noodles
·         1 lb. ground meat (beef, pork, turkey, etc.)
·         33 oz pasta sauce (half of the big 66 oz bottle)
·         1 tbsp olive oil
·         2 cups baby spinach leaves
·         ¼ cup chopped green onions
·         16 oz ricotta cheese
·         1 egg
·         2 Cups grated cheese (parmesan, mozzarella, whatever you prefer)
·         Salt, pepper, other seasonings you enjoy
·         Wax paper
·         9 x 13 glass baking dish

Start by preheating your oven to 375 degrees. You could wait to preheat it til you are closer to using it, but my oven takes FOREVER to preheat so I went ahead and did it right at the beginning. Then, start preparing the lasagna noodles according to the package.


While the noodles are boiling, brown your meat. I used ground turkey, which was really good. You could use pretty much any kind of ground beef or pork or whatever you like, or it can be meatless as well.


Add the turkey to your favorite pasta sauce. I used a “traditional” tomato sauce and then seasoned it to my liking.


In the pan with the juice from the turkey and the olive oil, wilt baby spinach leaves with chopped green onion. Season to make it delicious. After the spinach is wilted I would suggest chopping it up a little. I didn’t this time and it got pretty clumpy in the ricotta. It was probably an entertaining sight seeing me take a knife to the bowl of ricotta trying to cut up the spinach after the fact.


Bowl up your spinach and onion. (Is that a thing? Bowling?) Add ricotta cheese and one egg. Stir it all up. Salt, pepper, and otherwise season to taste.


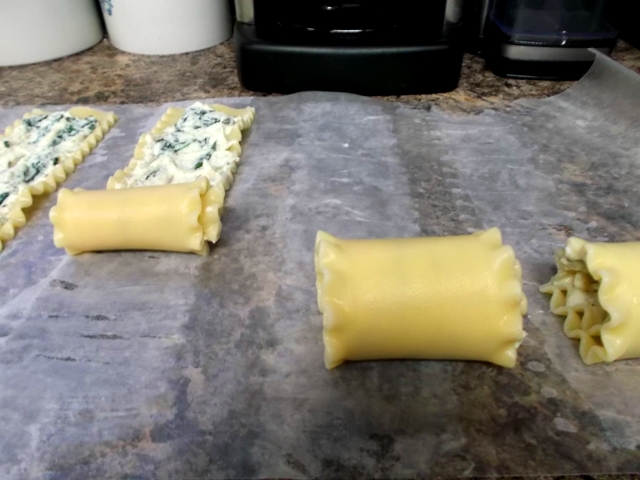
Lay out some wax paper, and lay out your lasagna noodles. In case you were wondering, lasagna noodles are very slippery. And you will drop them and try to catch them and burn yourself. Not that I’m speaking from experience or anything….. OK, I only dropped one!


Next spread a few spoonfuls of the ricotta mixture onto each noodle. About 2 or 3 tablespoons on each. 

Roll up each noodle.


Pour enough sauce in your baking dish to cover the bottom. Place the rolls in the dish in rows.


Cover the rolls with the remainder of the sauce. Top with your choice of grated cheese. I just used what we had on hand, which was some monterrey jack cheese, but parmesan would be good or whatever you prefer.

Put it all in the oven for about 30-35 minutes. Your cheese should be melty and bubbly and delicious.


Dish it up in convenient rolls, and enjoy! 

YUM!


Wednesday, December 5, 2012

Cheeseburger Flatbreads


Last night we had an experiment for dinner. Most of my cooking is usually an experiment though so that's not a surprise. I decided to try something I pinned to Pinterest a long time ago. We were low on groceries and nothing really sounded good so I got a little creative. We didn't have the exact ingredients that Pinterest suggested so I had to improvise.

First came the flatbread:


I used 2 1/4 cups Bisquick mix and 2/3 cup milk, then stir it all up.


Spread out a little Bisquick and dump your dough out. Knead it approximately 10 times or so. 


Next I took little handfuls of dough about the size you would use to make a biscuit and rolled them out into somewhat round shapes. They need to be pretty thin unless you want your flatbread to be not very flat (figured that one out the hard way).


Heat about 2 tablespoons of the oil of your choice over medium heat. Then add your flatbread.


Heat about 1 minute on each side, or until they are golden brown.


Next brown 1 pound of ground beef.


After the ground beef is browned and drained, I added ketchup, mustard, a little water, season salt, onion powder, and garlic powder. Kind of like sloppy joe mix, but not as creamy (?) I didn't really measure how much of each. Just added til it looked and tasted good. That's my style of measuring. Very accurate.


Now all that's left is to top the flatbread with our meat.


And of course a little shredded cheese. In my world, cheese goes on pretty much everything. Then just fold and eat! I enjoyed my flatbreads with a spinach salad and some cucumber slices. This made enough for 4 people, and no one complained or died from my cooking. That's a success in my book. Also, I realize my food photography is severely lacking, but you get the point. Simple and delicious!