Thursday, November 28, 2013

Rimmel London Stay Matte Liquid Mousse Foundation

I'm a teacher and a mom, so I don't have a lot of free time every day to devote to my makeup. I also don't like to take time to reapply throughout the day. So anything that saves me time and still looks great after 8 hours of running after kids is a good deal by me.

I have also been really into Rimmel London's whole line of makeup lately. Their Lash Accelerator Endless mascara is amazing and they have great eyeliners, eyeshadows, lipstick, lip gloss, BB cream and everything else. I really have yet to not like something of theirs that I have tried.

So when Influenster gave me the chance to test out the new Stay Matte Liquid Foundation (for free!) I was super excited. It comes in 8 different shades so you can find one that works great for you. Mine is in "True Ivory" and it matches my skin color perfectly.
Rimmel London's website says this about it:

"A feather light, oil free formula with an airy mousse texture that won’t feel heavy or greasy. Delivers all day shine control and blends flawlessly for a natural looking matte finish. Minimizes the appearance of pores. The weight is over – finally, shine has met its matte."


I have to say I agree with most of what they say. It has a super light feel to it, when you're putting it on and once it's on your face. It doesn't feel heavy or greasy. You don't have to use very much of it, and it's still a full coverage foundation. And the matte part is no joke. It looks like I've got powder on without using any. And it does last all day. Towards the end of the day, I do have some oil, but I tend to have really oily skin so that's to be expected. I don't think anything will make my face completely oil free. But overall, it's a great foundation if you want something really light with full coverage. I even got the opinion of a friend with pretty bad acne and red marks to cover up and she gave it her stamp of approval. Just the foundation was enough to give her the coverage she needed and the look of clear skin. Also without looking like she had a ton of makeup caked on.

So here's my typical school day look, just foundation, a little blush, eyeliner and mascara. 

I like that I look simple and not like I have a ton of makeup on. It also feels that way because the foundation is so light. Overall, I give this foundation two thumbs up and I will most likely be buying it again. Thank you to Influenster again for sending it to me, and thanks to Rimmel London for another great makeup product!


Sunday, June 9, 2013

Rainbow Cupcakes

My youngest sister graduated from high school this weekend. She was homeschooled and she had a graduation ceremony with two other girls from a homeschool co-op that her and my brother have been attending. So for the graduation each of the graduates had a special table with things that represented themselves - their interests, pictures, etc. They were also supposed to bring cupcakes to serve after the ceremony. So I agreed to make cupcakes for her. When I asked what kind she wanted she told me she liked bright colors. So what better way to have bright colors, than to have rainbow colored cupcakes?

I went in search of a recipe and found this recipe from Baking Bites. I looked over several recipes before deciding on this one. It looked fairly simple and I liked the fact that it would be a thinner batter to mix the colors in. The day before, I did a trial run of a dozen cupcakes to make sure they would turn out and any potential fails could be avoided. I did pretty good, and they actually weren't too difficult.

Before I started these, I decided I needed an apron. I'm just too messy in the kitchen. Especially if flour is involved. So I found some purple/lavender fabric and some rainbow sequin ribbon and created an apron for myself. I didn't get a picture unfortunately because I looked a little scary, but I will take one and post it eventually. But I'm pretty sure I'm the only one that liked my apron. Everyone else had either a "what in the world?" reaction, or just laughed at it. Rude.

So the day of, I gathered my supplies.

The only thing different I did from the recipe was used "Better for Bread" flour instead of all-purpose flour and used sunflower oil instead of vegetable oil. They still turned out fine. In the recipe she only makes 10 cupcakes. For my purposes I needed more cupcakes so I doubled the recipe and split it up to make 24 cupcakes instead of 20. There was plenty of batter for this.

When you get to mixing everything together, when you mix the wet ingredients to the dry ingredients, be sure not to stir it too much. Stir until everything is just mixed. It will be lumpy.
This is good. You are going to stir all the lumps out when you add the food coloring. I used gel food colorings. You could conceivably do this with as many or few or whatever colors you want. I just used red, yellow, green, blue, and mixed my own orange.
gif maker at gickr.com
fancy :)
So when your batter is all mixed up you layer the colors on top of each other in the muffin tin. I lined mine with white paper cups, since they would be travelling and it would be easier that way. Layer all your colors, in rainbow order, or whatever order you like, being sure not to stir or you'll end up with tie dye cupcakes I suppose. Just let each layer spread on its own. You will use about 1/2 tbsp of each color per cupcake.

As each layer went in, they got smaller and wouldn't spread out as far, but it wasn't bad. They still looked cute when they were done.
And you could see the rainbow colors through the white papers, so that was perfect.

For my frosting, I found this recipe for vanilla whipped cream frosting. Really simple and easy to get mixed up.
Three ingredients
All done!
My mom bought this weird decorating kit that came with a big syringe looking thing that you are supposed to put the icing in and then use it to decorate cakes and stuff. I used it, but it was difficult and made a HUGE mess. So next time I will definitely not be using it, I will just use the standard icing bag with decorating tips. But, all things considered they turned out pretty well.

I just did a simple spirally swirly shape on top. That's about all I have the skills for, and I didn't want them to look like dog poo. (You're welcome, sis.) I added some rainbow sprinkles on top, and called them good!

I'm pretty proud of how they turned out. And they were a big hit at the graduation. They went fast and I got lots of compliments. I promise my head's not too big. However, I will not be making these again any time soon, because they took me FOUR HOURS to make two dozen cupcakes. I know I'm not the fastest baker, but geez. It's just so time consuming to pour the batter in each cup by tiny spoonfuls. Plus I wanted to make sure these looked good since they were for a special occasion. But, all in all, they were a success, so go me!

So pretty :)


Saturday, May 18, 2013

Allspice Crumble Muffins

The other morning I woke up and wanted muffins. I haven't had muffins in such a long time so I just decided I'd make some. A quick internet search for "muffin" found me this recipe from Brown Eyed Baker that sounded delicious. I have recently discovered a love of allspice so these sounded perfect. Plus, I already had all the ingredients (major selling point).

I quickly mixed up the crumble topping, and the dry ingredients. Then I go to mix up the wet ingredients. I only had 3 eggs, but no big deal as the recipe only calls for 2. Then this happened.


Now, I don't know about you but to me, this looks suspiciously like what happens to a baby's diaper when he goes swimming in it... just saying. I swear I let the melted butter cool before I added the eggs to it. But it still failed. So I was stuck with half mixed up muffin mix, some nasty gloopy egg crap, and only one egg left in my carton.

So I had to cover up my mixing bowls, put on some real pants (bummer) and run to the store for more eggs, because I REALLY wanted these muffins. Attempt two was successful because I made sure the melted butter was extra cool before adding eggs.

Yum.
Here they are right before going into the oven.


I was a little worried about the crumble stuff on top because it is essentially just chunks of butter covered in a little flour and sugar. I didn't know if it was going to be gross or not. But I was pleasantly surprised because the tops ended up being chewy/crispy and delicious. I will say though that because there is so much butter on top of these that the bottoms of my muffin cups were pretty greasy. And I would definitely put the cookie sheet under your muffin tin because the tops expand and can kind of get everywhere.

But, bottom line these were worth the unexpected trip to the store because they were delicious. Buttery, crispy, chewy, light, fluffy, allspicey, goodness. I will definitely be making them again. 


P.S. When you use foil muffin cups, take them off before reheating your muffin in the microwave. Just a suggestion.

Monday, April 1, 2013

Lasagna Roll-ups


I want to share with you a recipe that I’ve done a few times now. Every time I’ve made it, it’s gone over really well with my family. I actually got my 13 year old brother to compliment my cooking with this one (and believe me, he’s hard pressed to say much nice to me about anything! Haha)

If you’re like me, cutting lasagna is something that never really ends well. It’s always a messy affair. This take on lasagna completely gets rid of all the mess and puts it in easy to serve rolls. One or two rolls are plenty for a meal. This recipe was used as dinner for 5 people, including a 13 year old with a bottomless stomach, so it’s a lot of food.

Here’s what you need:
·         12 lasagna noodles
·         1 lb. ground meat (beef, pork, turkey, etc.)
·         33 oz pasta sauce (half of the big 66 oz bottle)
·         1 tbsp olive oil
·         2 cups baby spinach leaves
·         ¼ cup chopped green onions
·         16 oz ricotta cheese
·         1 egg
·         2 Cups grated cheese (parmesan, mozzarella, whatever you prefer)
·         Salt, pepper, other seasonings you enjoy
·         Wax paper
·         9 x 13 glass baking dish

Start by preheating your oven to 375 degrees. You could wait to preheat it til you are closer to using it, but my oven takes FOREVER to preheat so I went ahead and did it right at the beginning. Then, start preparing the lasagna noodles according to the package.


While the noodles are boiling, brown your meat. I used ground turkey, which was really good. You could use pretty much any kind of ground beef or pork or whatever you like, or it can be meatless as well.


Add the turkey to your favorite pasta sauce. I used a “traditional” tomato sauce and then seasoned it to my liking.


In the pan with the juice from the turkey and the olive oil, wilt baby spinach leaves with chopped green onion. Season to make it delicious. After the spinach is wilted I would suggest chopping it up a little. I didn’t this time and it got pretty clumpy in the ricotta. It was probably an entertaining sight seeing me take a knife to the bowl of ricotta trying to cut up the spinach after the fact.


Bowl up your spinach and onion. (Is that a thing? Bowling?) Add ricotta cheese and one egg. Stir it all up. Salt, pepper, and otherwise season to taste.


Lay out some wax paper, and lay out your lasagna noodles. In case you were wondering, lasagna noodles are very slippery. And you will drop them and try to catch them and burn yourself. Not that I’m speaking from experience or anything….. OK, I only dropped one!


Next spread a few spoonfuls of the ricotta mixture onto each noodle. About 2 or 3 tablespoons on each. 

Roll up each noodle.


Pour enough sauce in your baking dish to cover the bottom. Place the rolls in the dish in rows.


Cover the rolls with the remainder of the sauce. Top with your choice of grated cheese. I just used what we had on hand, which was some monterrey jack cheese, but parmesan would be good or whatever you prefer.

Put it all in the oven for about 30-35 minutes. Your cheese should be melty and bubbly and delicious.


Dish it up in convenient rolls, and enjoy! 

YUM!


Tuesday, February 19, 2013

Review: The Taste: Tuesday 8|7c on ABC


Reality TV is one of my guilty pleasures. Especially reality TV about food. I could probably veg out in front of a cooking show or competition all day. So I was excited to learn about a new cooking competition show on ABC called The Taste. But this competition has a twist. The judges judge the food completely on taste alone; they don't know who cooked what, or even what exactly they are going to be eating. This is basically The Voice but with food. The judges/team leaders are 4 ridiculously good looking chefs: Anthony Bourdain, Brian Malarkey, Ludo Lefebvre, and Nigella Lawson. (Seriously, Nigella? Her job is to eat food and she still looks completely fabulous. So jealous.)

So the premise of the show is that each chef serves the judges one bite of their dish on a spoon, and the judges critique each spoon based on the taste, without knowing who cooked it. After the audition episodes, each of the judges chose a team of four chefs to compete. Each week the chefs have a team challenge where each teammate cooks a dish but then they choose the best dish from each team to be judged for the chance for immunity and the help of some well-known chef. During this challenge the judges are in the kitchen helping their team with advice and also providing entertainment for the audience. So far, we've seen a lot of arguing and somewhat playful banter between Chef Malarkey and Chef Ludo, and Anthony Bourdain downing an entire bottle of wine and strolling through the other teams' kitchens and generally being himself. Seriously, I just want Anthony Bourdain to read me a book every night before I go to sleep. Something about his voice is just pleasing to my ears. Plus he's entertaining of course. :)

Then things get interesting during the elimination challenge. The judges leave the kitchen so they have no idea who is cooking what. Each chef then has to prepare a dish fitting with the theme. The most recent episode was creating a dish that paired perfectly with their choice of one of four wines. They serve the dish in one bite to the judges. The judges then choose their most and least favorite dish. Then two people are sent home from the least favorites. Keep in mind, they don't know who cooked what so the possibility of sending someone from their own teams home is very real.

So far, I've enjoyed the episodes I've seen. The premise is very interesting, because the judges have to go by only what they taste. It ties into something I had just heard about the other day. Once you know what it is you are supposed to be eating, your brain gives you some preconceived notions about it, and can actually influence the way you perceive tastes. Not knowing makes you perceive the food differently. Another thing about this show I've enjoyed so far is the energy. The judges all seem to be so enthusiastic and the competition is fun and fast-paced. There hasn't been a dull moment yet!

The last thing is part of the reason I like to watch cooking shows. They inspire me! When I spend a lot of time watching a cooking show I always manage to get the idea in my head that I could be a great chef too (hah!) I get all ambitious until I remember it takes me longer just to cut up an onion than it does for these guys to whip up an entire dish and I come back to earth a little. But the main thing is that I get my creative juices flowing and get the urge to try new things, and I think that's always important. I may not be a five-star chef, but I can at least cook something creative that tastes good (most of the time).

So, if you like a fun cooking competition and want to feel inspired, check out The Taste, on Tuesday 8|7c on ABC. Catch up by watching the most recent episode here.

What about you? Do you like cooking shows? Do you get delusions of cooking grandeur after watching them? Will you be joining me to watch The Taste? Let me know!


Monday, January 21, 2013

Christmas Gifts

So I'm finally getting around to telling about my Christmas crafting. I don't know why it has taken me so long. But I promise I will try to be more diligent about posting. :)

I was pretty much broke this year for Christmas and so everyone got things that didn't take a lot of money. At first I was going to give everyone on my list handmade gifts, but that didn't end up happening. Let's just say my Christmas spirit was a little on the lazy side. But I did make some pretty cute things.

To start off with, this was my kiddo's first Christmas! So he had to have all the baby's first Christmas ornaments and jammies and outfits of course. He also needed a stocking. Everyone in my family (extended family included) has matching stockings that someone made for us. But I haven't requested one for Baby Z yet so I got creative. We had an extra stocking laying around so I decorated it for him.


 I just used glue and glitter for the name. I hot glued every green button I could find to make the tree. And then the star and the present are construction paper. I painted the red ribbon on the present. I think it turned out pretty cute. Except in the end it was a pretty small stocking and all of his gifts in it kind of got stuck at the top. Still cute though!

The next thing I made was a headband for my sister. I forgot to take a picture of the finished product (boo!) but it turned out pretty cute. And I actually used the sewing machine for it! haha. It pretty much confirmed the fact that I do not sew well at all. Even in inch long straight lines. I got the idea from this post at Make It & Love it. Here are the ones she made:


 I used an old t-shirt that I had tried to cut up for an off the shoulder shirt but it didn't turn out well so it was just sitting around waiting to be cut up some more. It was yellow which is my sister's favorite color so it worked perfectly. This was really easy and turned out pretty cute. I was going to make another one with some pink t-shirt scraps I had, but I ended up only having the sleeves and some really small pieces of it so it wasn't enough. But I plan on making more of these sometime because they are really cute! And I will definitely take pictures next time!

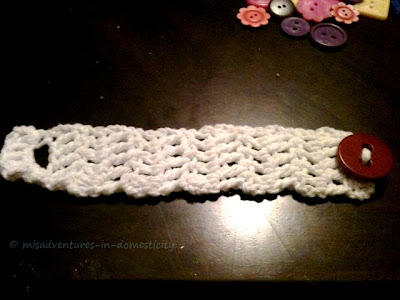
For my other sister I made a crocheted bracelet that also turned out pretty cute!


 It's just a cuff style bracelet about two inches wide. I used white yarn that I had at home and found a really cute large red (maroon ish?) button from our giant box of buttons. And it does button and unbutton.


I just stitched about 5 or so across and then double crocheted until it got to the right length. The button hole was done by double crochet in the first stitch then single chain 3 or 4 then double crochet the remaining stitches. Then I did one more double crochet row on top of that. Also, I'm not really brushed up on my technical crochet terms. I just wing it (what a surprise!) It was super easy and fast to make. I will probably end up having to make one of these for myself as well.

The last thing I made was a scarf for my grandmother. She actually requested that gift for herself because she had seen another scarf I had made. She bought the yarn for me so she could pick out the color and type she wanted. And then I got to work. This seriously took me so long to do and I'm not sure why. I just didn't work on it every day. It also turned out curly. I'm not sure how else to explain it. I was trying to go for just a straight plain scarf. I think what happened was that I crocheted it horizontally because I wanted the lines to be running the length of the scarf. And since I'm a little rusty on my crocheting, I added an extra stitch at the end of each row (I think). So I ended up with each row being a little longer than the last, which made it curl up. But I'm going to pretend that I meant for it to be that way, because it kind of looks that way.


Here it is laid out so you can see the width, and the fringe. She requested that it be long and wide so she could wrap it around her neck and chin to keep warm with.


And here I am modeling it. You can see the curly-ness here. But I kind of like it that way. Gives it character, right? 

So that was my creative output for the holidays. I actually enjoyed it. It inspired me to be even craftier next year! (But hopefully I will have some more funds available and I can be a little more generous.) All-in-all it was a pretty good holiday, even though my grandmother was in the hospital recovering from back surgery. We got to visit her pretty much every day, and she was recovering well. She's since been able to come home, praise the Lord! So here's to a new year and new craft adventures!

Tuesday, January 1, 2013

2012 A Reflection

2012 has been a life-changing year for me, literally. My son was born this year and my life will never be the same. I moved twice and had three different jobs (all at the same time). I started a completely new chapter in my life and I will never forget this year. This is the year I started figuring myself out and I hope that 2013 brings more of the same. I want to completely figure out how to be myself and do what I want to in my life. I want to provide the best I can for my son. 

I'm not really big on resolutions but I suppose my resolution would be to continue to better myself. Part of that would be to continue to build my repertoire of domestic achievements. Since I was pretty much broke this year from being on unpaid maternity leave (boo) I got pretty creative with some of my Christmas presents. I will do a post soon of all the things I made since everyone has gotten their gifts now. 

For now I'll just share how I spent my New Year's Eve. At home with my dad, sister, and son. I made chili using my mom's recipe, which turned out pretty darn good if I do say so myself. Then I made Oreo truffles and a crispy chocolate peanut butter truffle experiment. 


The Oreo truffles are just crushed Oreos mixed with cream cheese then dipped in chocolate almond bark, with a white chocolate almond bark drizzle. The others were crushed Ritz crackers mixed with peanut butter dipped in chocolate almond bark with a peanut butter drizzle. I've made the Oreo ones several times, but I wasn't sure how the peanut butter ones were going to turn out. The peanut butter and crackers didn't set up quite like the Oreos and cream cheese. But they turned out pretty good and I think I actually ended up liking them better than the Oreo truffles; not quite as sweet. 

My sister gave me a super cute wine glass for Christmas so I started my night out with one of the best drinks out there. 


I may have an obsession. I know it's bad for me but I've pretty much given up the idea of giving it up. You can't deprive yourself of everything you like, right? :) Then later on I filled my glass with champagne to properly toast the New Year :)

Overall, it was a pretty good day. Quiet, but good. Gave me time to reflect on my life a little bit. Even though I'm not in a place I would have ever expected myself to be, I'm moving forward. I expect that I will continue to move forward and find my place in the world. It is just taking a little longer than I thought it would. And I have the best person to accompany me now :)